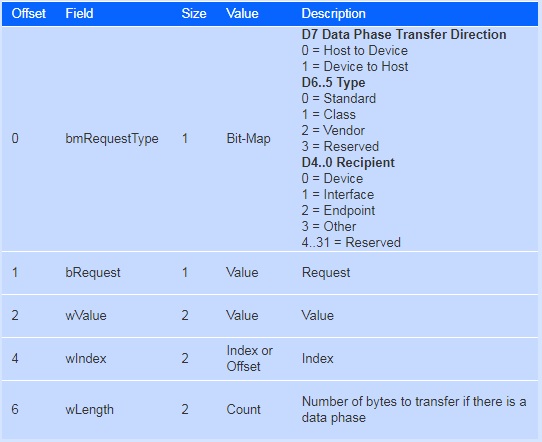
背景
Go内置了map类型,而其中重要的哈希算法是一个cityhash的变种。
同时,为了避免哈希冲突攻击(collision attack)和加速哈希计算速度,Keith Randall于Go1.0中就添加了x86_64支持的有硬件加速的AESHASH算法。
我搜遍了互联网,惊讶地发现,这个算法仅仅在Go里面有实现,这思路真是绝了。
这就被我这个四处搜索ARM64 Go runtime待优化点的人找到了:ARM64也支持AESHASH的硬件加速指令,但是Go并没有用上。
我嘴角又微微地一笑,满心欢喜准备加代码。可我并不知道,这看似平静的海面下不知道藏着什么妖怪……

开工
打蛇打七寸,看代码实现自然要先看头。
初始化代码在runtime/alg.go
if (GOARCH == "386" || GOARCH == "amd64") &&
GOOS != "nacl" &&
support_aes && // AESENC
support_ssse3 && // PSHUFB
support_sse41 { // PINSR{D,Q}
useAeshash = true
algarray[alg_MEM32].hash = aeshash32
algarray[alg_MEM64].hash = aeshash64
algarray[alg_STRING].hash = aeshashstr
// Initialize with random data so hash collisions will be hard to engineer.
getRandomData(aeskeysched[:])
return
}
可以看到,通过替换algarrary中的hash函数成aeshash,就完成了这个加速替换,
充分考虑了未来其他平台的跟进,赞叹同时感到这个简直就是盛情邀请我来完成接下来的工作。
先看看最简单的aeshash64的具体实现
//func aeshash64(p unsafe.Pointer, h uintptr) uintptr
TEXT runtime·aeshash64(SB),NOSPLIT,$0-24
MOVQ p+0(FP), AX // ptr to data
MOVQ h+8(FP), X0 // seed
PINSRQ $1, (AX), X0 // data
AESENC runtime·aeskeysched+0(SB), X0
AESENC runtime·aeskeysched+16(SB), X0
AESENC runtime·aeskeysched+32(SB), X0
MOVQ X0, ret+16(FP)
RET
注释也很清晰,AX载入了数据的指针,然后,把map的种子和数据载入X0中等待计算。
这里要说明一下,每个hashmap在初始化的时候都会随机分配一个种子,防止黑客找到系统的种子而发起哈希冲突攻击。
在接下来的几步中,使用程序初始化时生成的随机种子 runtime·aeskeysched 对数据进行加密,最后把结果返回。
更复杂的aeshash也只是加载各种长度进行计算而已。
到这,我只能感叹,这太简单了,便花了两个周末就写完了大体的代码,还碰到了以下问题:
- 平台差异
- Smhasher
- 冲突(Collision)
- Go编译器bug
平台差异
首先发现的问题是,ARM64并没有X86的AESENC,而是分成两个指令,AESE和AESMC。
先看了看AES的介绍
标准AES加密分成了4步:
- AddRoundKey
- SubBytes
- ShiftRows
- MixColumns
X86的AESENC指令等价于:
- SubBytes
- ShiftRows
- MixColumns
- data XOR Key
但是……ARM64的AESE指令等价于:
- AddRoundKey
- SubBytes
- ShiftRows
所以,要是单纯模仿X86的AESENC X0,X0写法时……数据就会被清空掉……(摔。
无奈,只好另寻出路,用系统随机种子加密数据,代码思路如下:
// 把系统种子载入 V1
// 再将种子和数据载入 V2
AESE V1.B16, V2.B16
SMhasher&Collision
解决了上个问题,开始进行测试。
Go使用的是Smhasher,一个Hash函数是否达标需要通过以下测试:
- Sanity,必须处理整个key
- AppendedZeros,填零,长度不同
- SmallKeys,所有小key(< 3字节)组合
- Cyclic,循环,例如:11211->11121
- Sparse,稀疏,例如:0b00001和 0b00100
- Permutation,组合,每个block排列组合顺序不同
- Avalanche,翻转每个位
- Windowed,例如产生的hash值是32位的,那么就20位相同,结果也需要不同
- Seed,种子变化会影响结果
每一次Smhasher报错,我都开始看代码哪里出了问题,一般都是放错寄存器这些低级错误……
Go还会对map中bucket分配情况进行测试,如果某个bucket放了过多的数据,一样也会出错。
不过,这部分还是比较顺利的。
Go编译器bug
搞定了这个,我又发现另一个坑。
为了减少指令,我希望直接把寄存器中的数据直接载入到ARM64 Vector Lane
但是Go的编译器没办法正确编译不同的lane index。
例如下面两条指令,最终产生的指令码是一样……
VMOV R1, V2.D[0]
VMOV R1, V2.D[1]
只好先报个bug。
cmd/asm: wrong implement vmov/vld on arm64
然后用原生字节码先顶着了,想知道如何做到可以直接拉到Tips
妖怪
终于,所有runtime的Smhasher和Hash测试都通过了,我开始试着运行src/all.bash来构建Go。
这时我拉到了海底的那只妖怪……

构建日志
$ ./all.bash
Building Go cmd/dist using /usr/lib/go-1.6.
Building Go toolchain1 using /usr/lib/go-1.6.
Building Go bootstrap cmd/go (go_bootstrap) using Go toolchain1.
Building Go toolchain2 using go_bootstrap and Go toolchain1.
Building Go toolchain3 using go_bootstrap and Go toolchain2.
# runtime
duplicate type..hashfunc.struct { "".full "".lfstack; "".empty "".lfstack; "".pad0 [64]uint8; "".wbufSpans struct { "".lock "".mutex; "".free "".mSpanList; "".busy "".mSpanList }; _ uint32; "".bytesMarked uint64; "".markrootNext uint32; "".markrootJobs uint32; "".nproc uint32; "".tstart int64; "".nwait uint32; "".ndone uint32; "".alldone "".note; "".helperDrainBlock bool; "".nFlushCacheRoots int; "".nDataRoots int; "".nBSSRoots int; "".nSpanRoots int; "".nStackRoots int; "".markrootDone bool; "".startSema uint32; "".markDoneSema uint32; "".bgMarkReady "".note; "".bgMarkDone uint32; "".mode "".gcMode; "".userForced bool; "".totaltime int64; "".initialHeapLive uint64; "".assistQueue struct { "".lock "".mutex; "".head "".guintptr; "".tail "".guintptr }; "".sweepWaiters struct { "".lock "".mutex; "".head "".guintptr }; "".cycles uint32; "".stwprocs int32; "".maxprocs int32; "".tSweepTerm int64; "".tMark int64; "".tMarkTerm int64; "".tEnd int64; "".pauseNS int64; "".pauseStart int64; "".heap0 uint64; "".heap1 uint64; "".heap2 uint64; "".heapGoal uint64 }
build failed
咦……编译器构建出错??? 测试都通过了啊!?
再运行一次all.bash,发现出错的地方还不一样???
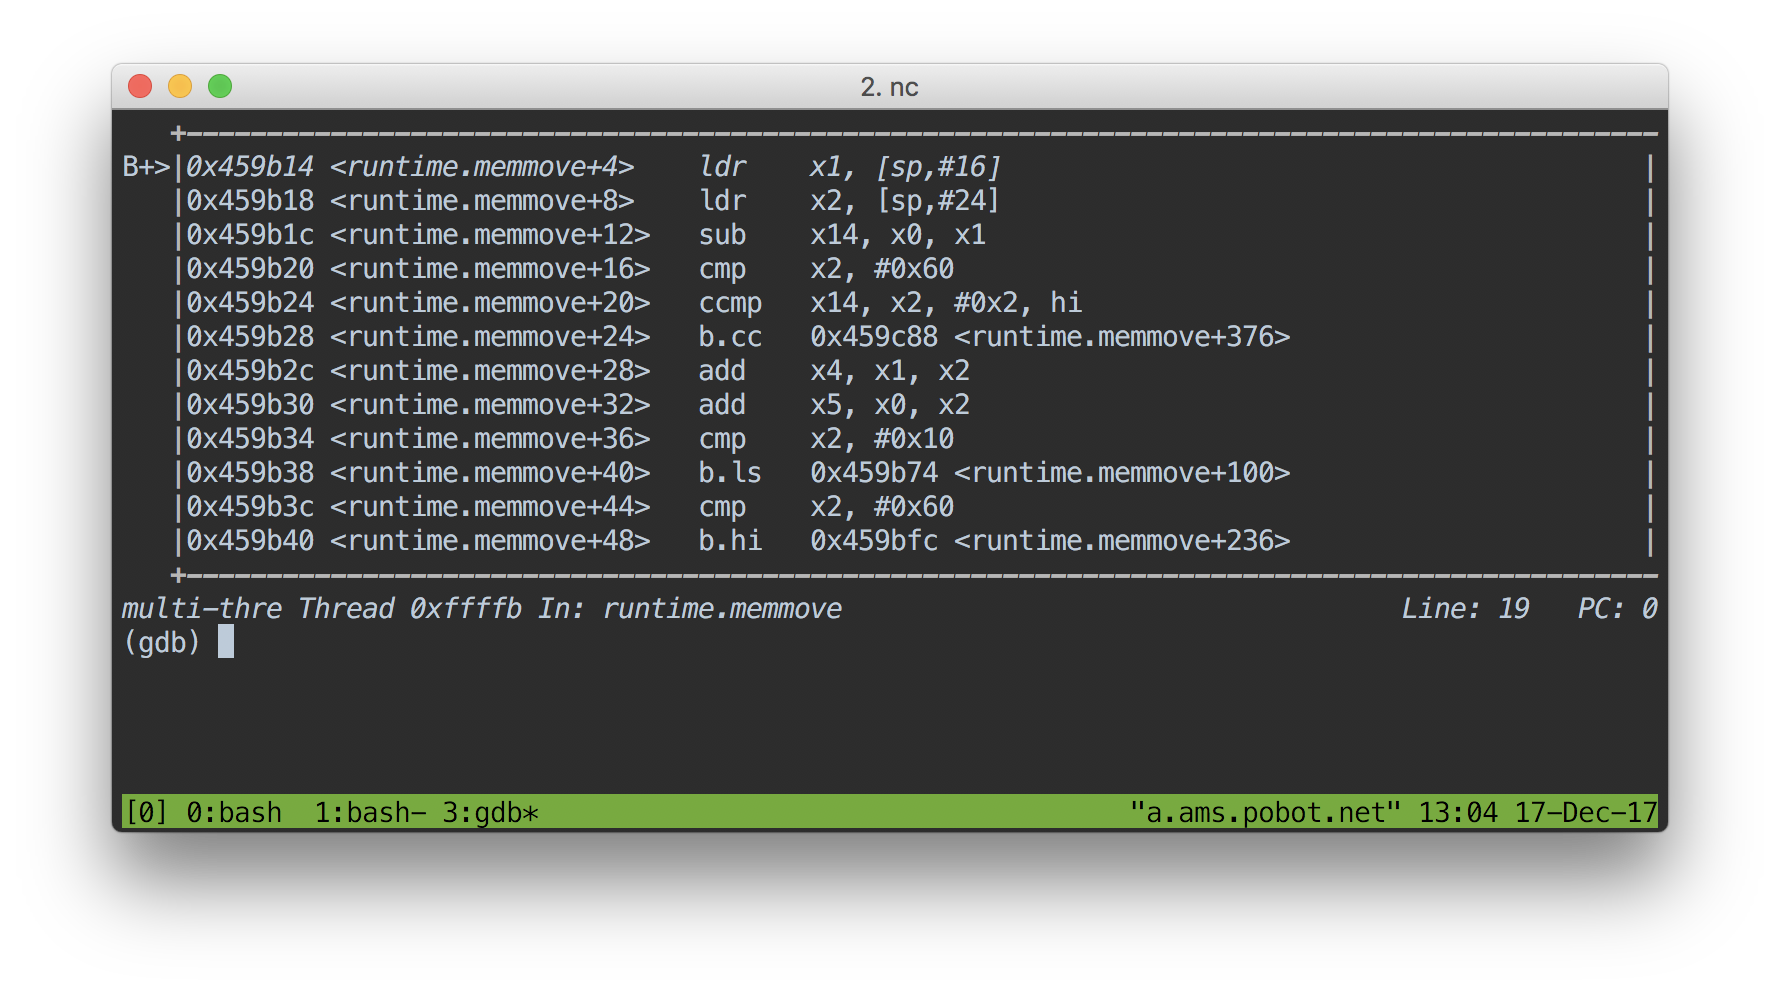
用gdb断点在我写的asm_arm64.s:aeshash,跟踪执行流程,在对长字符串(>129)哈希也没有问题。
难道是编译器的bug?
所以我开始跟踪编译器的动作,发现只有符号表(symbol)使用了map的功能。
恶补了编译器的基本原理和Go实现后,我才意识到,这个符号表也仅仅用了aeshashstr(对字符做hash)的功能。
我把Smhasher中对aeshash的全部改装成了aeshashstr,发现还是能奇迹般地通过测试!
手动校验了一次,发现就算把aeshash32和aeshash64都搞得和x86实现一样,包括结果,还是报错!
于是我把这怪异的问题发邮件,发帖子,发群里问遍了所有人。还是无解。
就这样折腾了1个月业余的时间,基本看完了编译器的相关代码,
发现明明是两个不同的符号(symbol)还是会被认为是同一个。
最后还蛋疼地想用钱看看有没有人愿意帮debug一下。
态度惹怒了不少人。我想我是被这bug整得脑子进水了吧……
出坑
直到最近,我才突然意识到没准Smhasher测试并没有覆盖完所有情况?
果然,仔细检查后在aeshash129plus这一段有
SUBS $1, R1, R1
BHS aesloop
这个SUBS是SUB再对比,在R1=1的时候,就退出了。
但Smhasher仅仅对128个字节做了完整的测试,所以测试能通过,但是编译不了。
而这个bug仅仅在256个字节以上才会触发(摔。
改进后是
SUB $1, R1, R1
CBNZ R1, aesloop
最终可以提交CL
runtime: implement aeshash for arm64 platform
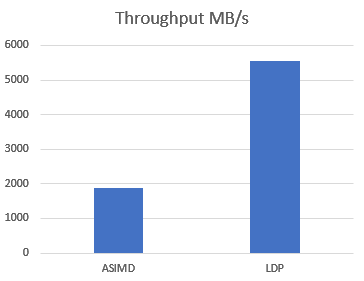
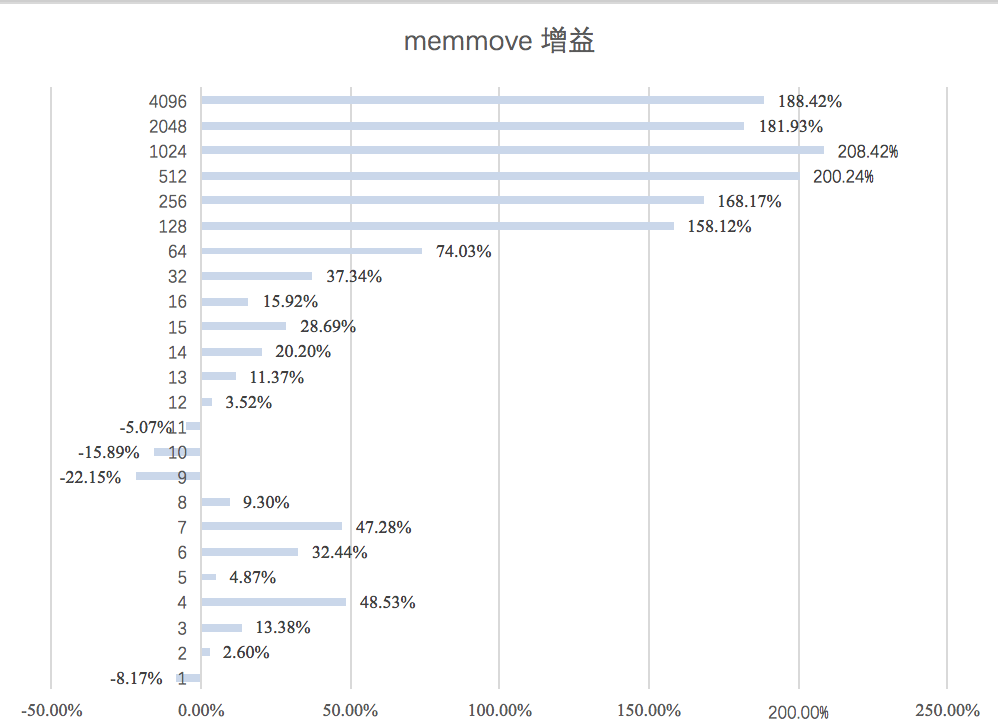
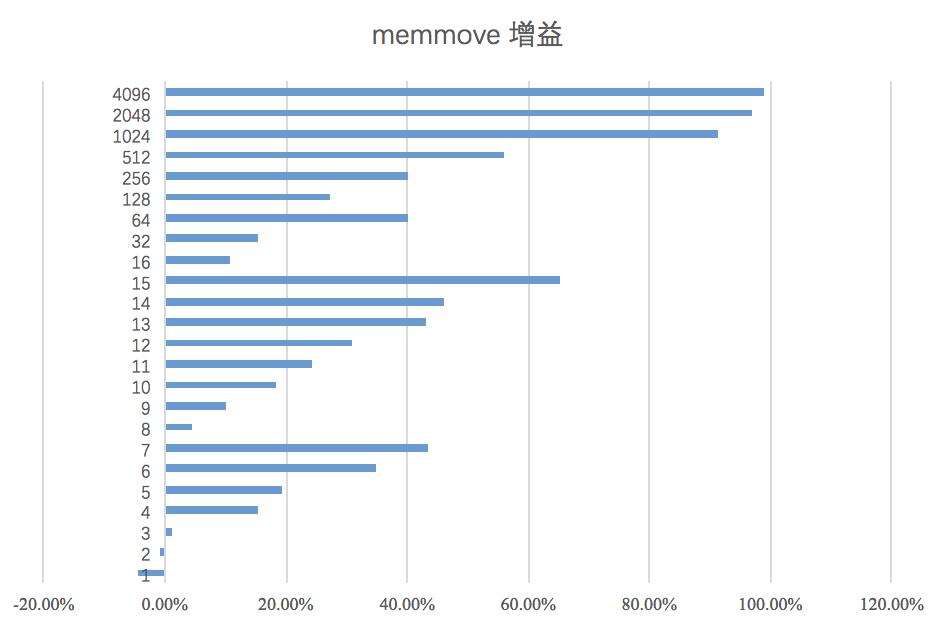
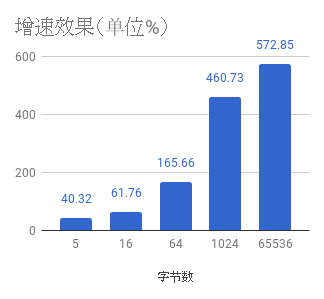
注意,如果使用PRFM指令,速度能加快30-40MB左右(Hash1024)。可能是下次优化的重点(对齐和Cache)
name old speed new speed delta
Hash5 97.0MB/s ± 0% 97.0MB/s ± 0% -0.03% (p=0.008 n=5+5)
Hash16 329MB/s ± 0% 329MB/s ± 0% ~ (p=0.302 n=4+5)
Hash64 858MB/s ±20% 890MB/s ±11% ~ (p=0.841 n=5+5)
Hash1024 3.50GB/s ±16% 3.57GB/s ± 7% ~ (p=0.690 n=5+5)
Hash65536 4.54GB/s ± 1% 4.57GB/s ± 0% ~ (p=0.310 n=5+5)
如何用GNU汇编语言生成原生ARM64指令字节码?
$cat vld.s
ld1 {v2.b}[14], [x0]
$as -o vld.o -al vld.lis vld.s
AARCH64 GAS vld.s page 1
1 0000 0218404D ld1 {v2.b}[14], [x0]
其中第三列就是生成的字节码,复制到go中就OK了
WORD $0x4D401802
其实还有工具asm2plan9s, 只是目前这个工具没办法编译ARM64
感谢
最后非常感谢
- Wei Xiao
- Fangming
- Keith Randall
对于我细致的帮助