文字显示在各种面板类插件几乎是必有的项目,比如默认在Gnome-shell的面板正中央就是一个文字类的时间显示器。
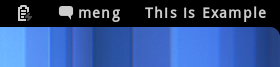
 废话不说,直接上实现效果:
代码如下,或者去[GITHUB上下载](https://github.com/mengzhuo/gnome-shell-
example/zipball/Lesson_2):
const St = imports.gi.St;
const Main = imports.ui.main;
const PanelMenu = imports.ui.panelMenu;
let metadata,indicator = null;
function ExampleIndicator(){
this._init();
}
ExampleIndicator.prototype = {
__proto__: PanelMenu.Button.prototype,
_init: function (){
global.log('EXAMPLE:Enabled');
PanelMenu.Button.prototype._init.call(this, St.Align.END);
this.label = new St.Label({text:"This is Example"});
this.actor.add_actor(this.label);
Main.panel._rightBox.add_actor(this.actor);
},
destroy: function(){
global.log('EXAMPLE:Disabled');
Main.panel._rightBox.remove_actor(this.actor);
}
}
function enable() {
indicator = new ExampleIndicator();
}
function disable() {
indicator.destroy();
}
function init(metadata) {
global.log('EXAMPLE:%s Initialized '.format(metadata.uuid));
}
你可能会惊呼怎么比第一篇多了这么多代码,简直就反人类嘛! 其实,还是差不多的。看看上次我们说的enable函数,里面是不是变成了
indicator = new ExampleIndicator();
至于为什么这么构造,可以看具体文章「ECMAScript
定义类或对象」
借助这种方法我们调用了PanelMenu.Button.prototype这一原型,然后把它放入这一原型的actor中。Actor是clutter中的概念,具体可以看其参考文档「[ClutterActor](http://docs
.clutter-
project.org/docs/clutter/stable/ClutterActor.html)」,不过我个人理解成「要显示的东西都往这塞吧」的容器。
我们这次要放一个文本显示框进去,所以以下代码来构造一个新的St.Label(和GTK里面的很像吧:)
this.label = new St.Label({text:“This is Example”});
这样就好了,是不是很简单呢~
小小的扩展—-CSS控制
用GJS显示文字这么简单,但是这和python到底有什么不同?这就是接下来的部分要讲的啦~用CSS控制其样式! 把上面的创建St.Label实例的代码改成
this.label = new St.Label({text:"This is Example"}); this.label.add_style_class_name('example');
是不是很眼熟?对,就是web前端经常干的事,给DOM添加类。 然后你也猜到了—-修改stylesheet.css呗
.example{color:red;}
Alt+F2后,输入「rt」就可以重载css,不需要重载整个G.S是不是更方便了呢!  Vala~!
总结
本章我们学习了文字显示,大家还可以用上篇的LookingGlass来调查这个St.Label实例里还有什么可以玩的,下篇是「图像和图标显示」哦~